
In our previous tutorial, we built a supplier management app using Django. If you haven’t gone through that tutorial yet, check it out here: Learn Django Fast: Build a CRUD App for a Retail Company.
We’re taking a step further to create a product management app that allows retailers to manage their products. Each product can be linked to multiple suppliers, ensuring a relationship between products and supplier.
Takeaways from This Post
- Linked Products to Multiple Suppliers using a Many-to-Many relationship.
- Make your HTML codes more maintainable, reusable, and scalable
- Fully tested source code can be cloned from GitHub
- https://github.com/henryphchan/henryc48.sg-host.com/tree/main/Python/Django/retail_project
Step 1: Create the product_app
Let’s start by creating a new Django app for managing products.
Run the following command in your project folder:
python manage.py startapp product_appAdd 'product_app' to the INSTALLED_APPS list in your settings.py:
INSTALLED_APPS = [
    ...
    'supplier_app',
    'product_app',
]
Step 2: Define the Product Model
A product has a name, description, price, stock quantity, and multiple suppliers.
Open product_app/models.py and define the Product model:
from django.db import models
from supplier_app.models import Supplier  # Importing Supplier model

class Product(models.Model):
    ProductID = models.AutoField(primary_key=True)
    Name = models.CharField(max_length=200)
    Description = models.TextField(blank=True, null=True)
    Price = models.DecimalField(max_digits=10, decimal_places=2)
    StockQuantity = models.PositiveIntegerField()
    Suppliers = models.ManyToManyField(Supplier, related_name="products")  # Many-to-Many relationship

    def __str__(self):
        return self.Name
After adding this model, run the following commands to apply migrations:
python manage.py makemigrations product_app
python manage.py migrate
If you open your SQLite file, you will found that 2 tables (product_app_product and product_app_product_Supplier) has been created automatically.
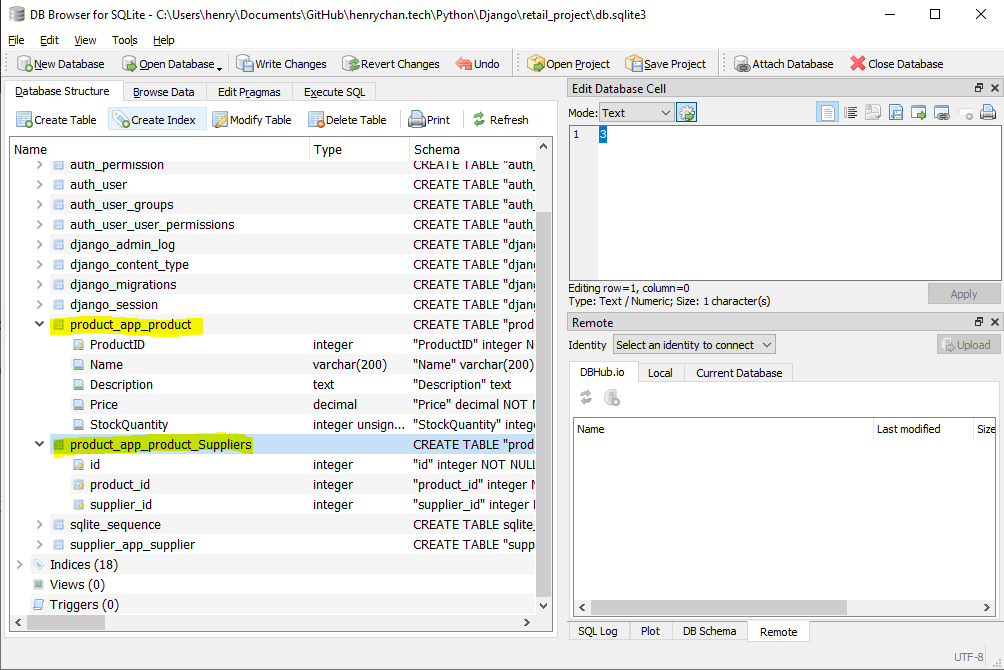
product_app_product is the main table for storing product information. It corresponds directly to your Product model.
product_app_product_Suppliers is created automatically by Django to handle the Many-to-Many relationship between Product and Supplier. Since each product can have multiple suppliers, Django creates this intermediate table to store the relationships.
Step 3: Create the Product Form with Validation
We’ll now create a Django form to handle product creation and validation.
Open product_app/forms.py and add the following code:
from django import forms
from .models import Product

TEXTAREA_CLASS_ATTR = "bg-gray-50 border border-gray-300 text-gray-900 text-sm rounded-lg focus:ring-primary-600 focus:border-primary-600 block w-full p-2.5 dark:bg-gray-700 dark:border-gray-600 dark:placeholder-gray-400 dark:text-white dark:focus:ring-primary-500 dark:focus:border-primary-500"
NUMBER_CLASS_ATTR = "bg-gray-50 border border-gray-300 text-gray-900 text-sm rounded-lg focus:ring-primary-600 focus:border-primary-600 block w-full p-2.5 dark:bg-gray-700 dark:border-gray-600 dark:placeholder-gray-400 dark:text-white dark:focus:ring-primary-500 dark:focus:border-primary-500"
SELECT_MULTI_CLASS_ATTR = "bg-gray-50 border border-gray-300 text-gray-900 text-sm rounded-lg focus:ring-blue-500 focus:border-blue-500 block w-full p-2.5 dark:bg-gray-700 dark:border-gray-600 dark:placeholder-gray-400 dark:text-white dark:focus:ring-blue-500 dark:focus:border-blue-500"

class ProductForm(forms.ModelForm):
    class Meta:
        model = Product
        fields = ['Name', 'Description', 'Price', 'StockQuantity', 'Suppliers']
        widgets = {
            'Name': forms.TextInput(attrs={
                'class': TEXTAREA_CLASS_ATTR,
                'placeholder': 'Enter product name'
            }),
            'Description': forms.Textarea(attrs={
                'class': TEXTAREA_CLASS_ATTR,
                'rows': 3,
                'placeholder': 'Enter product description'
            }),
            'Price': forms.NumberInput(attrs={
                'class': NUMBER_CLASS_ATTR,
                'placeholder': 'Enter price'
            }),
            'StockQuantity': forms.NumberInput(attrs={
                'class': NUMBER_CLASS_ATTR,
                'placeholder': 'Enter stock quantity'
            }),
            'Suppliers': forms.SelectMultiple(attrs={
                'class': SELECT_MULTI_CLASS_ATTR,
            }),
        }

    def clean_Price(self):
        price = self.cleaned_data.get('Price')
        if price is not None and price < 0:
            raise forms.ValidationError("Price must be a positive number.")
        return price

    def clean_StockQuantity(self):
        stock_quantity = self.cleaned_data.get('StockQuantity')
        if stock_quantity is not None and stock_quantity < 0:
            raise forms.ValidationError("Stock quantity cannot be negative.")
        return stock_quantity
In the supplier_app, we hardcoded all the classes in html, however, we can define most of the form attributes in the form.py. Using constants like TEXTAREA_CLASS_ATTR, NUMBER_CLASS_ATTR, and SELECT_MULTI_CLASS_ATTR allows you to reuse the same styles across multiple form fields. If you ever need to change the styling, you only update the constants, and the changes will reflect everywhere the constants are used. This approach also eliminate duplicate CSS class definitions. This follows the DRY (Don’t Repeat Yourself) principle. I’ll show you the html soon.
Step 4: Build Views to Handle CRUD Operations
Now, let’s create views for listing, adding, updating, and deleting products.
Open product_app/views.py and add the following:
from django.shortcuts import render, redirect, get_object_or_404
from .models import Product
from .forms import ProductForm
from django.contrib import messages

def product_list(request):
    products = Product.objects.all()
    return render(request, 'product_app/product_list.html', {'products': products})

def product_create(request):
    if request.method == 'POST':
        form = ProductForm(request.POST)
        if form.is_valid():
            form.save()
            messages.success(request, "Product has been added successfully.")
            return redirect('product_list')
        else:
            messages.error(request, "Please correct the errors below.")
    else:
        form = ProductForm()
    return render(request, 'product_app/product_form.html', {'form': form})

def product_update(request, pk):
    product = get_object_or_404(Product, pk=pk)
    if request.method == 'POST':
        form = ProductForm(request.POST, instance=product)
        if form.is_valid():
            form.save()
            messages.success(request, "Product has been updated successfully.")
            return redirect('product_list')
        else:
            messages.error(request, "Please correct the errors below.")
    else:
        form = ProductForm(instance=product)
    return render(request, 'product_app/product_form.html', {'form': form, 'product': product})

def product_delete(request, pk):
    product = get_object_or_404(Product, pk=pk)
    if request.method == 'POST':
        product.delete()
        messages.success(request, "Product has been deleted successfully.")
        return redirect('product_list')
    return render(request, 'product_app/product_confirm_delete.html', {'product': product})
Step 5: Define URLs
Create a product_app/urls.py file:
from django.urls import path
from . import views

urlpatterns = [
    path('', views.product_list, name='product_list'),
    path('new/', views.product_create, name='product_create'),
    path('edit/<int:pk>/', views.product_update, name='product_update'),
    path('delete/<int:pk>/', views.product_delete, name='product_delete'),
]
Then, include this in the project’s urls.py:
from django.contrib import admin
from django.urls import path, include
from django.views.generic import TemplateView

urlpatterns = [
    path('', TemplateView.as_view(template_name='index.html'), name='index'),
    path('admin/', admin.site.urls),
    path('supplier/', include('supplier_app.urls')),
    path('products/', include('product_app.urls')), #Add this line
]
Step 6: Create Templates
6.1 Create Product List page in product_app/templates/product_app/product_list.html
{% extends 'base.html' %}
{% block content %}
    <div class="relative overflow-x-auto">
        <div class="max-w-screen-md">
            <h2 class="mb-4 text-4xl tracking-tight font-extrabold text-gray-900 dark:text-white">Product List</h2>
            <a href="{% url 'product_create' %}">
                <button type="button" class="mt-4 text-white bg-blue-700 hover:bg-blue-800 focus:ring-4 focus:ring-blue-300 font-medium rounded-lg text-sm px-5 py-2.5 me-2 mb-2 dark:bg-blue-600 dark:hover:bg-blue-700 focus:outline-none dark:focus:ring-blue-800">Add Product</button>
            </a>
        </div>
        <table class="w-full mt-4 text-sm text-left rtl:text-right text-gray-500 dark:text-gray-400">
            <thead class="text-xs text-gray-700 uppercase bg-gray-50 dark:bg-gray-700 dark:text-gray-400">
                <tr>
                    <th scope="col" class="px-6 py-3">Product Name</th>
                    <th scope="col" class="px-6 py-3">Price</th>
                    <th scope="col" class="px-6 py-3">Stock</th>
                    <th scope="col" class="px-6 py-3">Action</th>
                </tr>
            </thead>
            <tbody>
                {% for product in products %}
                <tr class="bg-white border-b dark:bg-gray-800 dark:border-gray-700">
                    <th scope="row" class="px-6 py-4 font-medium text-gray-900 whitespace-nowrap dark:text-white">{{ product.Name }}</th>
                    <td class="px-6 py-4">{{ product.Price }}</td>
                    <td class="px-6 py-4">{{ product.StockQuantity }}</td>
                    <td class="px-6 py-4">
                        <a href="{% url 'product_update' product.pk %}">Edit</a> -
                        <a href="{% url 'product_delete' product.pk %}">Delete</a>
                    </td>
                </tr>
                {% endfor %}
            </tbody>
        </table>
    </div>

    {% if messages %}
        {% for message in messages %}
        <div id="toast-message" class="fixed bottom-4 right-4 p-4 mb-4 flex items-center w-full max-w-xs p-4 mb-4 text-gray-500 bg-white rounded-lg shadow dark:text-gray-400 dark:bg-gray-800" role="alert">
            <div class="inline-flex items-center justify-center flex-shrink-0 w-8 h-8 text-green-500 bg-green-100 rounded-lg dark:bg-green-800 dark:text-green-200">
                <svg class="w-5 h-5" aria-hidden="true" xmlns="http://www.w3.org/2000/svg" fill="currentColor" viewBox="0 0 20 20">
                    <path d="M10 .5a9.5 9.5 0 1 0 9.5 9.5A9.51 9.51 0 0 0 10 .5Zm3.707 8.207-4 4a1 1 0 0 1-1.414 0l-2-2a1 1 0 0 1 1.414-1.414L9 10.586l3.293-3.293a1 1 0 0 1 1.414 1.414Z"/>
                </svg>
                <span class="sr-only">Check icon</span>
            </div>
            <div class="ms-3 text-sm font-normal">{{ message }}</div>
            <button type="button" class="ms-auto -mx-1.5 -my-1.5 bg-white text-gray-400 hover:text-gray-900 rounded-lg focus:ring-2 focus:ring-gray-300 p-1.5 hover:bg-gray-100 inline-flex items-center justify-center h-8 w-8 dark:text-gray-500 dark:hover:text-white dark:bg-gray-800 dark:hover:bg-gray-700" data-dismiss-target="#toast-message" aria-label="Close">
                <span class="sr-only">Close</span>
                <svg class="w-3 h-3" aria-hidden="true" xmlns="http://www.w3.org/2000/svg" fill="none" viewBox="0 0 14 14">
                    <path stroke="currentColor" stroke-linecap="round" stroke-linejoin="round" stroke-width="2" d="m1 1 6 6m0 0 6 6M7 7l6-6M7 7l-6 6"/>
                </svg>
            </button>
        </div>
        {% endfor %}

        <script>
            document.addEventListener("DOMContentLoaded", function () {
                setTimeout(function () {
                    const toastMessage = document.getElementById("toast-message");
                    if (toastMessage) {
                        // Add a class to trigger the transition/animation
                        toastMessage.classList.add("opacity-0", "translate-y-4", "transition", "duration-500");

                        // Wait for the animation to finish before removing the element
                        toastMessage.addEventListener("transitionend", function () {
                            toastMessage.remove();
                        });
                    }
                }, 3000); // 3000 milliseconds = 3 seconds
            });
        </script>
    {% endif %}

{% endblock %}
6.2 Create Product Form page in product_app/templates/product_app/product_form.html
{% extends 'base.html' %}
{% block content %}
<section class="bg-white dark:bg-gray-900">
    <div class="py-8 px-4 mx-auto max-w-2xl lg:py-16">
        <h2 class="mb-4 text-xl font-bold text-gray-900 dark:text-white">{% if product %}{{ product.Name }}{% else %}Add a new Product{% endif %}</h2>
        <form method="post">
            {% csrf_token %}
            <div class="grid gap-4 sm:grid-cols-2 sm:gap-6">
                <div class="w-full">
                    <label for="id_Name" class="block mb-2 text-sm font-medium text-gray-900 dark:text-white">Product Name</label>
                    {{ form.Name }}
                    {% if form.Name.errors %}
                        <div class="text-red-500 text-sm">{{ form.Name.errors }}</div>
                    {% endif %}
                </div>
                <div class="w-full">
                    <label for="id_Suppliers" class="block mb-2 text-sm font-medium text-gray-900 dark:text-white">Suppliers</label>
                    {{ form.Suppliers }}
                    {% if form.Suppliers.errors %}
                        <div class="text-red-500 text-sm">{{ form.Suppliers.errors }}</div>
                    {% endif %}
                </div>
                <div class="w-full col-span-2">
                    <label for="id_Description" class="block mb-2 text-sm font-medium text-gray-900 dark:text-white">Description</label>
                    {{ form.Description }}
                    {% if form.Description.errors %}
                        <div class="text-red-500 text-sm">{{ form.Description.errors }}</div>
                    {% endif %}
                </div>
                <div class="w-full">
                    <label for="id_Price" class="block mb-2 text-sm font-medium text-gray-900 dark:text-white">Price</label>
                    {{ form.Price }}
                    {% if form.Price.errors %}
                        <div class="text-red-500 text-sm">{{ form.Price.errors }}</div>
                    {% endif %}
                </div>
                <div class="w-full">
                    <label for="id_StockQuantity" class="block mb-2 text-sm font-medium text-gray-900 dark:text-white">Stock Quantity</label>
                    {{ form.StockQuantity }}
                    {% if form.StockQuantity.errors %}
                        <div class="text-red-500 text-sm">{{ form.StockQuantity.errors }}</div>
                    {% endif %}
                </div>

            </div>
            <button type="submit" class="mt-4 text-white bg-blue-700 hover:bg-blue-800 font-medium rounded-lg text-sm px-5 py-2.5">
                {% if product %}Update Product{% else %}Add Product{% endif %}
            </button>
            <a href="{% url 'product_list' %}" class="inline-flex items-center mt-4 text-gray-700 bg-gray-200 hover:bg-gray-300 focus:ring-4 focus:ring-gray-300 font-medium rounded-lg text-sm px-5 py-2.5 me-2 mb-2 dark:bg-gray-600 dark:hover:bg-gray-700 focus:outline-none dark:focus:ring-gray-800">Cancel</a>
        </form>
    </div>
</section>
{% endblock %}
In Django templates, {{ form.Name }} is a helper representation of the Name field from a Django ModelForm. It automatically renders the HTML form field based on the field definition in the form class. Django automatically generates the HTML for the form field based on the field type and attributes. The field inherits all attributes from the widgets dictionary in ProductForm.
6.3 Create Product Delete page in product_app/templates/product_app/product_confirm_delete.html
{% extends 'base.html' %}
{% block content %}
<section class="bg-white dark:bg-gray-900">
    <div class="py-8 px-4 mx-auto max-w-2xl lg:py-16">
        <h2 class="mb-4 text-xl font-bold text-gray-900 dark:text-white">Delete Product</h2>
        <p class="mb-4 text-sm text-gray-900 dark:text-white">Are you sure you want to delete <strong>{{ product.Name }}</strong>?</p>
        <form method="post">
            {% csrf_token %}
            <button type="submit" class="inline-flex items-center mt-4 text-white bg-red-600 hover:bg-red-700 focus:ring-4 focus:ring-red-300 font-medium rounded-lg text-sm px-5 py-2.5 me-2 mb-2 dark:bg-red-500 dark:hover:bg-red-600 focus:outline-none dark:focus:ring-red-800">Yes, delete</button>
            <a href="{% url 'product_list' %}" class="inline-flex items-center mt-4 text-gray-700 bg-gray-200 hover:bg-gray-300 focus:ring-4 focus:ring-gray-300 font-medium rounded-lg text-sm px-5 py-2.5 me-2 mb-2 dark:bg-gray-600 dark:hover:bg-gray-700 focus:outline-none dark:focus:ring-gray-800">Cancel</a>
        </form>
    </div>
</section>
{% endblock %}
6.4 Update the Navigation bar in the base.html
<!DOCTYPE html>
<html lang="en">
<head>
    <meta charset="UTF-8">
    <meta name="viewport" content="width=device-width, initial-scale=1.0">
    <link href="https://cdn.jsdelivr.net/npm/flowbite@2.5.2/dist/flowbite.min.css" rel="stylesheet" />
    <link href="https://cdn.jsdelivr.net/npm/tailwindcss@2.2.19/dist/tailwind.min.css" rel="stylesheet">
    <title>Retail Project</title>
</head>
<body class="mx-2">
    <nav class="bg-white dark:bg-gray-800 antialiased">
        <div class="max-w-screen-xl px-4 mx-auto 2xl:px-0 py-4">
          <div class="flex items-center justify-between">

            <div class="flex items-center space-x-8">
              <div class="shrink-0">
                <a href="{% url 'index' %}" class="flex items-center justify-between mr-4">
                    <img
                      src="https://henrychan.tech/wp-content/uploads/2024/11/cropped-avataaars-150x150.png"
                      class="mr-3 h-8"
                      alt="SmallApp.Dev Logo"
                    />
                    <span class="self-center text-2xl whitespace-nowrap text-gray-900 dark:text-white">Retail</span>
                </a>
              </div>

              <ul class="hidden lg:flex items-center justify-start gap-6 md:gap-8 py-3 sm:justify-center">
                <li>
                  <a href="{% url 'index' %}" title="" class="flex text-sm font-medium text-gray-900 hover:text-primary-700 dark:text-white dark:hover:text-primary-500">
                    Home
                  </a>
                </li>
                <li class="shrink-0">
                  <a href="{% url 'supplier_list' %}" title="" class="flex text-sm font-medium text-gray-900 hover:text-primary-700 dark:text-white dark:hover:text-primary-500">
                    Supplier
                  </a>
                </li>
                <li class="shrink-0">
                  <a href="{% url 'product_list' %}" title="" class="flex text-sm font-medium text-gray-900 hover:text-primary-700 dark:text-white dark:hover:text-primary-500">
                    Product
                  </a>
                </li>
              </ul>
            </div>

            <div class="flex items-center lg:space-x-2">

              <button type="button" data-collapse-toggle="ecommerce-navbar-menu-1" aria-controls="ecommerce-navbar-menu-1" aria-expanded="false" class="inline-flex lg:hidden items-center justify-center hover:bg-gray-100 rounded-md dark:hover:bg-gray-700 p-2 text-gray-900 dark:text-white">
                <span class="sr-only">
                  Open Menu
                </span>
                <svg class="w-5 h-5" aria-hidden="true" xmlns="http://www.w3.org/2000/svg" width="24" height="24" fill="none" viewBox="0 0 24 24">
                  <path stroke="currentColor" stroke-linecap="round" stroke-width="2" d="M5 7h14M5 12h14M5 17h14"/>
                </svg>
              </button>
            </div>
          </div>

          <div id="ecommerce-navbar-menu-1" class="bg-gray-50 dark:bg-gray-700 dark:border-gray-600 border border-gray-200 rounded-lg py-3 hidden px-4 mt-4">
            <ul class="text-gray-900 dark:text-white text-sm font-medium dark:text-white space-y-3">
              <li>
                <a href="{% url 'index' %}" class="hover:text-primary-700 dark:hover:text-primary-500">Home</a>
              </li>
              <li>
                <a href="{% url 'supplier_list' %}" class="hover:text-primary-700 dark:hover:text-primary-500">Supplier</a>
              </li>
              <li>
                <a href="{% url 'product_list' %}" class="hover:text-primary-700 dark:hover:text-primary-500">Product</a>
              </li>
            </ul>
          </div>
        </div>
    </nav>

    <div class="container mx-auto">
        {% block content %}{% endblock %}
    </div>

    <footer class="p-4 bg-white md:p-8 lg:p-10 dark:bg-gray-800">
        <div class="mx-auto max-w-screen-xl text-center">
            <a href="https://henrychan.tech" class="flex justify-center items-center text-2xl font-semibold text-gray-900 dark:text-white">
                <img
                src="https://henrychan.tech/wp-content/uploads/2024/11/cropped-avataaars-150x150.png"
                class="mr-2 h-8"
                alt="SmallApp.Dev Logo"
                />
                Henry's Dev Journey
            </a>
            <p class="my-6 text-gray-500 dark:text-gray-400">A data engineer’s diary - Overcoming daily challenges, sharing solutions, and exploring the evolving data landscape.</p>
            <span class="text-sm text-gray-500 sm:text-center dark:text-gray-400">Created by <a href="https://henrychan.tech" class="hover:underline">Henry's Dev Journey</a>.</span>
        </div>
      </footer>

    <script src="https://cdn.jsdelivr.net/npm/flowbite@2.5.2/dist/flowbite.min.js"></script>

</body>
</html>
Step 7: Test Your Product Management App
7.1 Run your development server
python manage.py runserverGo to http://127.0.0.1:8000/products/ to manage products in your retail system!
Now that we have a Supplier and Product management system, I believe you have gained a solid understanding of how to build a Django CRUD application from scratch. You’ve learned how to set up models, create forms with validation, implement views for CRUD operations, and style your templates effectively.
However, this is just the beginning of your Django journey. You may extend this project with Order & Customer apps to track customer purchases and product sales.
Happy Coding!